Ever witnessed a netted filter encircling the microphones? You must have. If you are a content creator, you must have used that several times in your studio.
If you are not a content creator, you must have seen it somewhere on the TV or on YouTube. The reason I am saying this with certainty is that it is one of the most common items used in studios.
Do you know what it is? Why is it used in the studios? Can you attach it to other recording devices? Questions like these are less common in the minds of content creators who are already doing well in the field than those who aspire to leave their mark in the field.
His inquisitive mind will circle questions like how to attach a pop filter to blue yeti. Can blue yeti work well if you don’t connect it with a pop filter? Etc.
To address such common questions, we have come forward with this article. Grab your cup of tea and go through all the essential points discussed in this article!
Let’s jump in!
What is a Pop Filter? Why is it Placed around a Microphone?
Have you ever observed a unique plosive sound occur whenever you utter the letter B and P? If yes, then you must know that the intensity of such popping sounds drastically heightens as you speak into the mic.
You must be thinking about the origin of these popping sounds and how to eradicate or minimize their effect so that your voice won’t scare away your audience. Right?
In that case, you can show gratitude to our content writers later. Right now, concentrate on whatever knowledge is coming your way.
So the popping sound that you often hear in the studio can be minimized by manipulating the services of pop filters. Did you just read ‘pop filter’?
Of course, you did. Well, how can that do you favor then? This must be your next question. And if you have just landed in this field, you must be thinking about what a pop filter is. Don’t worry! We have got answers for you on one platform.
Hopefully, the things will make sense to you if you read them with focus!
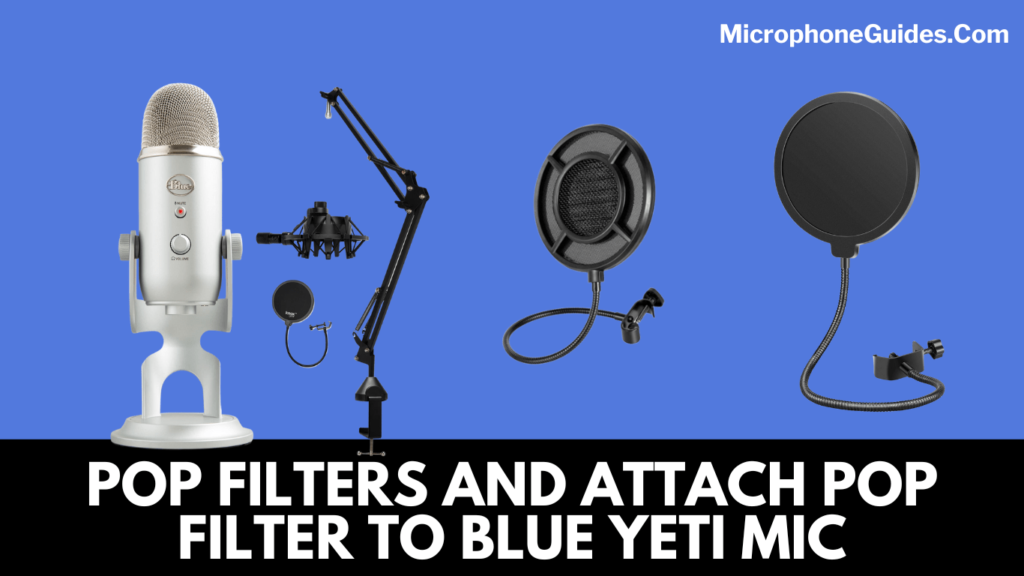
Pop filters are handy, netted, plate-like structures that are used by the great majority of content creators to filter all the popping and plosive sounds so that your audience won’t get irritated. As popping sounds can make the audience go crazy if they continue for a longer period. Since pop filters deal with low-end and high-end sound issues, you won’t need to struggle with editing much. All the unwanted sounds are obliterated by the pop filter automatically.
How Can You Connect Blue Yeti and Pop Filter on Your Own, Without Contacting an Expert?
The contemporary world is popular for many inventions, trends, and concepts. For instance, the Z generation always prefers YouTube videos to television. They don’t have enough stamina to watch a movie on television. Even if you forcefully made them do it, they still have smartphones in their hands.
True? Agree?
Another famous trend of today’s generation is DIY. Have you heard about DIY before? Okay, don’t worry if you haven’t. We will let you know everything step by step. So DIY symbolizes the Do It Yourself philosophy.
In a nutshell, today’s generation won’t wait for a professional to come and get the work done for them. They want to explore different dimensions of technology and the universe. And for that, it is important to play with gadgets.
We have described below the simplest steps you can undertake for making a smooth relationship between blue yeti and pop filter. Get yourself ready for the steps!
1. Separate the Mounting Arm and the Gooseneck
Pop filters consist of two main parts: Gooseneck and mounting arm. The foremost thing you are supposed to do is to separate the two parts. Don’t get me wrong man!
Separating the two parts doesn’t mean tearing them off or making them two different entities. No! You don’t need that. Just unscrew the two parts, so the connection is loose and conducive.
2. Lock the Gooseneck Between the Screws of the Mounting Arm and C-clamp.
Easy and important step it is. After unscrewing the components mentioned above, you need to lock the gooseneck tightly between the screws of the mounting arms and the screws of the C-clamp.
3. Unscrew the Mounting Stand of Yeti
After the pop filter is ready to connect with the blue yeti, it is time that you put effort to prepare the blue yeti. For that purpose, you need to take off the pre-integrated mounting stand screws in blue yeti.
Keep in mind that you only need to remove screws from one side of the yeti and not from both sides.
4. Give the Final Touches
Once the screws of the mounting arms are removed and both the equipment are ready to connect, give these final touches. In the final hour, you need to connect the mounting arm of the pop filter to the exposed side of the blue yeti.
Once both parts are connected, tighten the screws that you previously unscrewed. Speak into the microphone to see if the sound is clear. If the sound is not clear, repeat the process with added focus and concentration.
Final Statement
Microphones are handy, and so are the pop filters. Pop filters are plate-like, netted structures that have a mounting arm and a gooseneck and that are used to filter all the popping sounds that result whenever you speak the word B and P into the microphone. A brief introduction to pop filters is discussed in this article, followed by the steps you can undertake to connect blue yeti and pop filters. Take advantage of the provided information and enjoy your time!

It’s me Brian Baldree professional sound engineer. I love to write about microphones, headphones, and musical instruments and review it’s quality.